
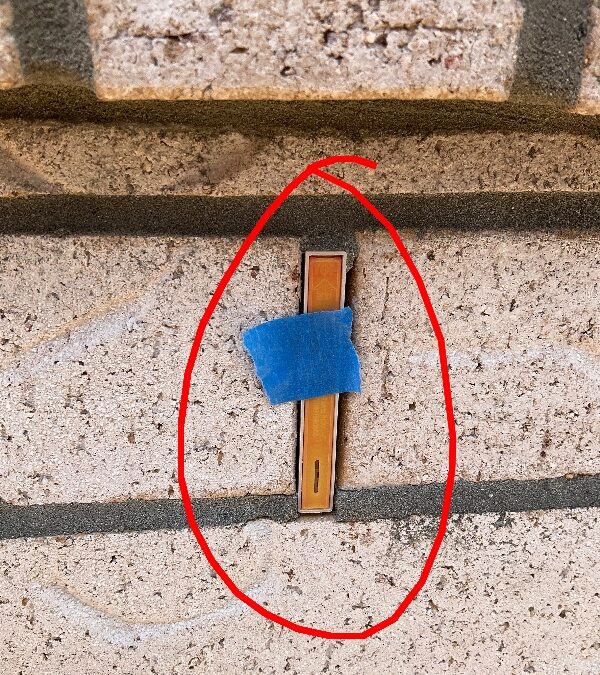
Weep holes in brickwork are intentional drainage openings. Before handover, check that the visible openings are clear, any temporary construction guards have been dealt with, and permanent inserts are fitted as intended. A cover left in place, an insert pushed too far back or a vent projecting from the wall are useful details to raise with your builder.
A practical completion inspection (PCI), also called a handover inspection, is a good opportunity to record these concerns while the external work is being finished. Here are three examples from GoInspect inspections, followed by a simple checklist for your new home.
Takeaway: Keep the drainage path open, but identify the fitting before removing anything. A temporary mortar guard and a permanent pest or ember screen have different jobs.
What are weep holes in brickwork for?
In cavity masonry, weep holes provide an outlet for moisture collected within the wall. They can be formed as open vertical mortar joints or incorporate purpose-made fittings. Flashings help direct moisture towards the outside; the opening needs to remain able to do its job.
The ABCB Housing Provisions, Part 5.7, sets out a masonry weatherproofing pathway, including weep-hole positioning above flashings and specified exceptions. The applicable requirements depend on your building approval and wall design. Do not assume every gap needs filling, or that every opening around a window should look identical.
1. Weep-hole covers left in place
One GoInspect handover report called for weep-hole covers to be removed around the house. The photograph at the top of this article shows a covered opening marked for attention. The useful question for the supervisor is: “Is this a temporary construction guard, and what needs to happen before handover?”
Some manufactured weep-hole formers have a guard that keeps mortar or finishing material out during construction. For example, Weepa’s installation guide distinguishes the removable mortar guard from the grate that remains. Its face-brick instructions describe removing the guard after clean-up; the rendered-wall sequence allows for the final finish and painting first.
That example explains the distinction; it does not identify the brand in our inspection photograph. Ask the builder to confirm the installed product and follow its instructions. A general instruction to remove every plastic or metal fitting would be misleading.
2. An insert pushed too far into the opening
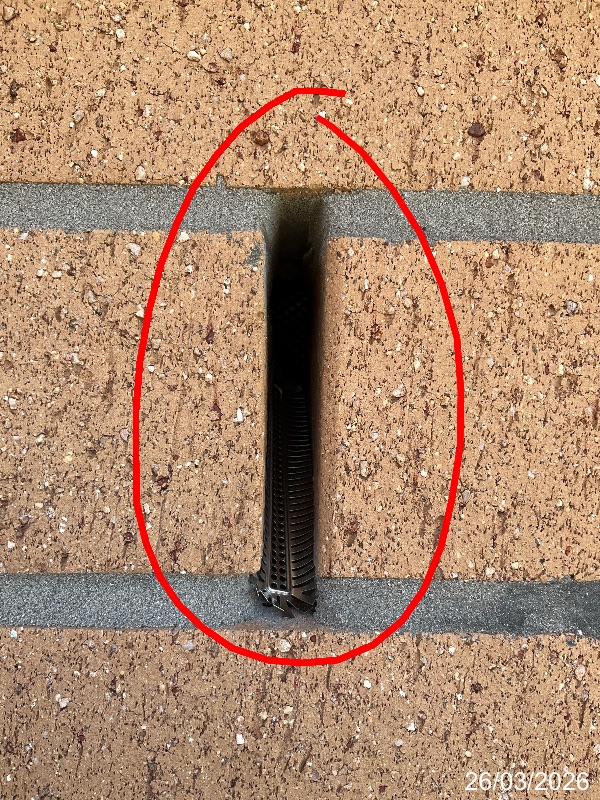
A separate GoInspect report recorded weep-hole covers pushed in too deeply. The close-up shows the recessed fitting and the location marked by the inspector.
This needs a product-specific response. Ask the builder to check the fitting’s position against the installation details and confirm that the intended opening remains functional. The fact that a slot is visible at the wall face does not establish the condition of the concealed cavity or flashing behind it.
3. A vent projecting from the brick face
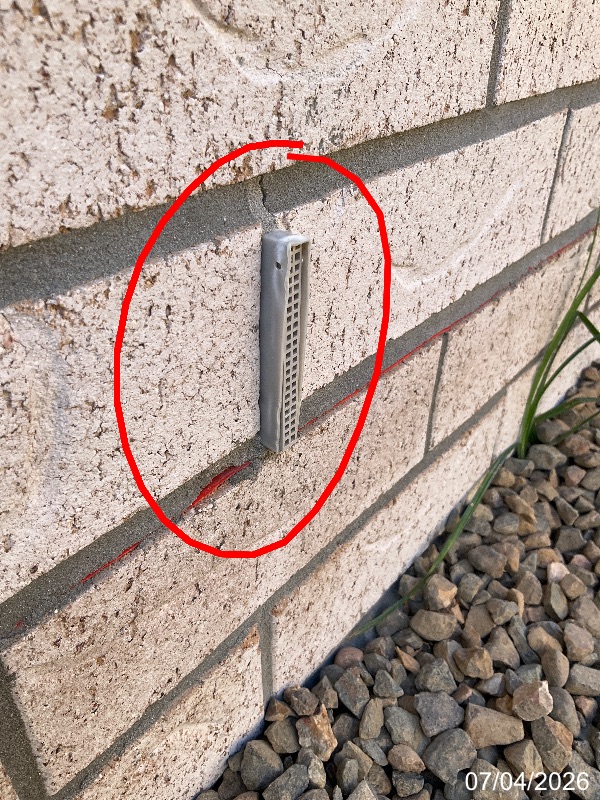
Another report called for proud weep-hole vents to be adjusted. “Proud” means projecting beyond the surrounding surface. This is a different finding from a cover left on or an insert recessed too deeply.
Keep that distinction in the defect list. Ask the builder to check and adjust the installation to suit the actual product and wall finish. Do not hammer the vent into the wall yourself: the appropriate depth and method need to be confirmed first.
Your brick weep-hole checklist before handover
Walk the accessible perimeter from ground level with the supervisor or inspector. Look for:
- Covered or obstructed openings: mortar, render, paint, debris or a temporary guard may need attention.
- Insert position: record fittings that appear recessed, loose, damaged or noticeably projecting.
- Finished ground levels: check whether soil, mulch, gravel or paving is covering the openings or is planned to do so.
- Unclear gaps: ask whether a gap is an intentional drainage opening or missing mortar requiring repair.
- Remaining work: ask who will check the openings after rendering, painting, paving and landscaping are complete.
QBCC’s supervision and quality-control checklist includes clear, correctly positioned weep holes, cleaned wall cavities and damp-proof courses. These are related details, rather than a reason to judge the whole wall from one photograph.
Should weep holes have screens or covers?
They can have purpose-made grilles or screens that preserve the intended drainage and ventilation. Some buildings also need particular ember-protection details. The correct fitting depends on the design, product and applicable requirements; an opening does not have to be completely bare to be functional.
Ask for the product name and installation instructions if you are unsure. Avoid sealing the slot with silicone, foam or mortar to keep insects out. Discuss a suitable permanent fitting with the builder instead.
Keep them clear after moving in
New garden beds or paths can change the conditions at the base of a wall. QBCC’s home-maintenance guidance says to keep weep holes above soil level and consider drainage when planning landscaping.
If you notice an obstruction, photograph it and ask how it should be addressed. Avoid drilling or probing deep into the cavity, where concealed components may be damaged. A blocked opening is worth investigating; it does not, by itself, prove that internal water damage has occurred.
How to raise a weep-hole defect with your builder
Record the wall location, take an overview and a close-up, and describe the visible condition. “Vent projecting at the rear wall beside the patio” is clearer than “brickwork wrong”. Keep the response linked to the original finding and ask what will be checked after the work is complete.
GoInspect’s new-home handover and practical completion inspections assess visible and safely accessible workmanship within the agreed scope. We document identified concerns with photographs and locations so your builder has a clear record to work through. If your home is approaching completion, request your inspection quote and tell us about any external work still to be finished.