
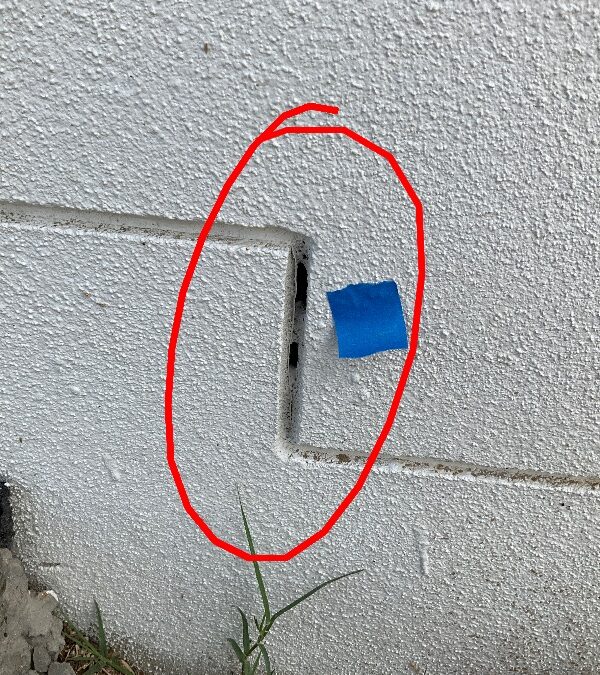
Before handover, check rendered walls for chips, holes, unfinished joints, cracking and repairs that stand out from the surrounding finish. Record the location and ask the builder how each item will be assessed or completed. A visible mark can establish that something needs attention; it does not, by itself, establish why it happened or what is concealed behind the wall.
These three findings from GoInspect handover reports show useful things to look for: a chip beside a tap, holes behind a downpipe and a control joint requiring sealing. They illustrate specific conditions, rather than a claim that every rendered home has the same problems.
A practical render checklist before handover
Walk around the safely accessible exterior with the builder or inspector. Include the garage opening, piers, balcony walls and areas around taps, pipes and fittings. Keep clear of incomplete edges and restricted work areas.
- Chips and impact damage: look at corners, edges and finished areas beside fittings.
- Holes and unfinished work: note visible openings, abandoned fixing holes and incomplete finishes around installed components.
- Joints: identify visibly unfinished or damaged sections and ask whether the completed joint matches the specified detail.
- Cracking: record its location, pattern and any associated staining or displacement for assessment.
- Patch appearance: compare the texture and colour of repairs with the surrounding wall.
- Other surface concerns: point out peeling, bulging, staining or visibly loose material. Keep people away from material that appears at risk of falling and notify the builder promptly.
Do not climb onto roofs, lean over balcony edges or remove fittings to extend this check. Tell the inspector which elevations or areas concern you so safe access and the appropriate inspection scope can be discussed.
Render chips: record the damage and its position
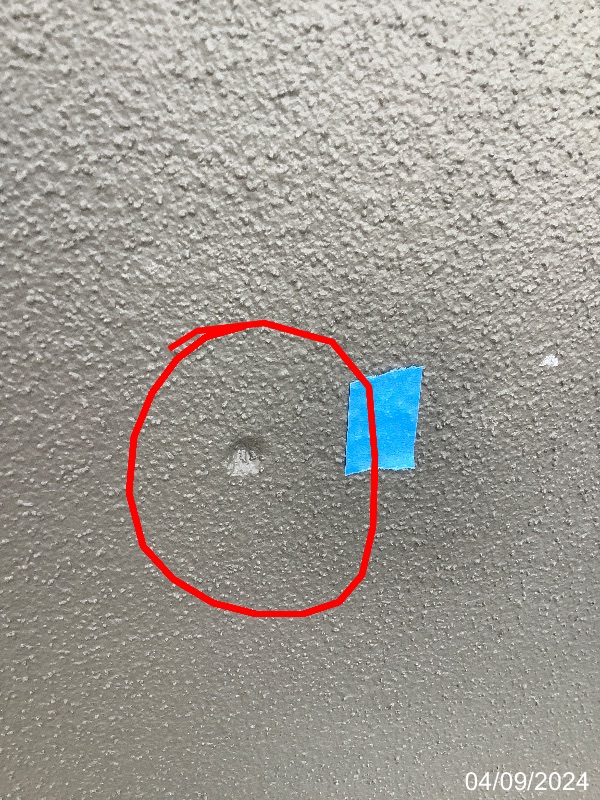
A GoInspect report recorded chipped render beside a balcony tap. The close-up shows the localised mark in the textured finish. The useful next step is to identify the exact position for repair and agree how the finished surface will be checked afterwards.
Keep an overview photograph as well as a close-up in your own defect records. “Chip beside balcony tap” is easier to locate than “render damaged”. Avoid assuming which trade caused it unless there is evidence. The builder can coordinate the response where several trades have worked in the same area.
Holes behind a downpipe: check the finished wall too
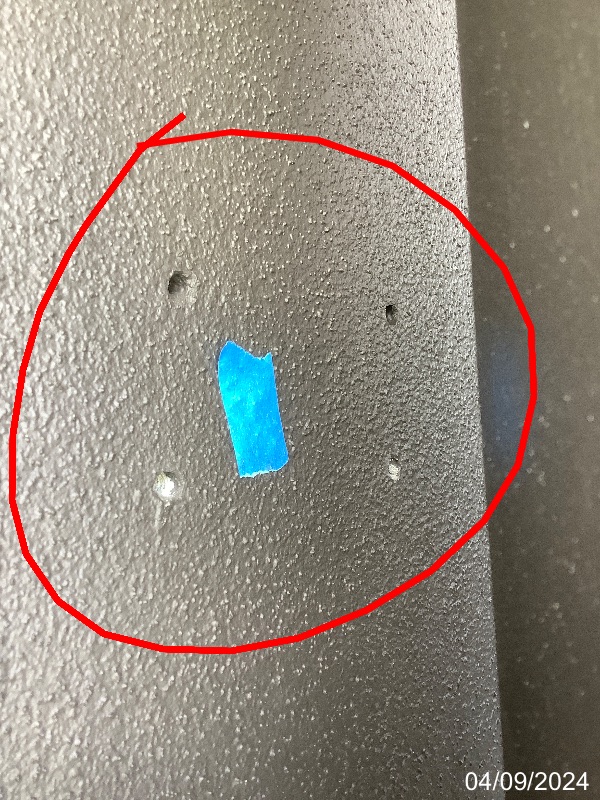
Another finding in the same report called for holes in the render behind a downpipe to be repaired. The pipe can draw attention away from the wall surface, so it helps to look at both the fitting and the surrounding finish where they are safely visible.
The finding establishes the visible holes and the requested repair. It does not establish their depth, the wall system behind them or whether water has entered. Ask the builder to confirm the repair method for the installed render and coating system, including how the finished appearance will be restored. A dab of paint should not be assumed to be the complete repair.
An unfinished control joint needs the correct detail
The control joint shown in the lead photograph was recorded in a separate GoInspect report, beside a garage opening. The inspector requested sealing of the joint. That is a specific unfinished item, rather than a recommendation to fill every visible line in a rendered wall.
Control joints must retain their intended function. Queensland’s QBCC Standards and Tolerances Guide, sections 10.3–10.4, addresses carrying joints through render and avoiding finishes that restrain or cover them inappropriately. The actual substrate, joint detail and product instructions need to be identified before specifying a repair.
Ask: which joint detail applies here, what work remains, and what product will be used? The photograph records an open section; it does not reveal concealed joint construction or establish the performance of the completed wall.
Will a render patch blend in?
A repair can close a damaged area yet leave an obvious change in texture or colour. Discuss the intended finish before work starts, particularly where a small patch sits in a broad, uninterrupted wall.
Section 10.1 of the QBCC guide addresses matching repaired render as closely as possible during the first 12 months after completion. It recognises practical matching difficulties and discusses using natural separators, or refinishing a whole wall where appropriate. It also cautions against painting pre-coloured render simply to hide defects.
For general colour and texture assessment, section 1.4 uses normal viewing positions and diffuse, non-critical light, generally from at least 1.5 metres away. A close-up is useful for locating damage; harsh glancing light should not be the sole basis for judging the overall finish.
What about cracks or hollow-sounding render?
Cracks need assessment in context. Record where they occur and whether there are associated symptoms, rather than labelling every hairline crack structural or harmless. The QBCC guide distinguishes masonry and lightweight substrates; one generic crack rule should not be applied to every rendered wall.
A hollow sound alone is not a complete diagnosis of the installed wall system. Ask the inspector or relevant specialist what the observation establishes and whether further investigation is appropriate. Do not strike, scrape or remove finished render yourself. Where a particular product system is identified, its current manufacturer instructions should inform any installation or repair advice.
Turn the findings into a clear follow-up list
For each item, keep the location, description, photographs, builder’s response and proposed completion date together. After work is reported complete, check the same location and record the outcome against the original item. A completion message and an inspection of the repair are different records.
For Queensland domestic work, QBCC’s handover guidance explains documenting minor defects and omissions and their follow-up. An independent report supports that discussion; it does not decide payment obligations or provide occupancy approval.
A practical completion inspection (PCI), also called a handover inspection, can document visible workmanship, damage and incomplete work within the agreed scope. Arrange it when the relevant work is substantially finished and safely accessible, with time to discuss the findings. Concealed construction and specialist testing need separate consideration.
Takeaway: identify the condition, locate it clearly and check the proposed repair against the actual wall system. For a new-home inspection, use GoInspect’s current quote and booking form to confirm the service and property details.