
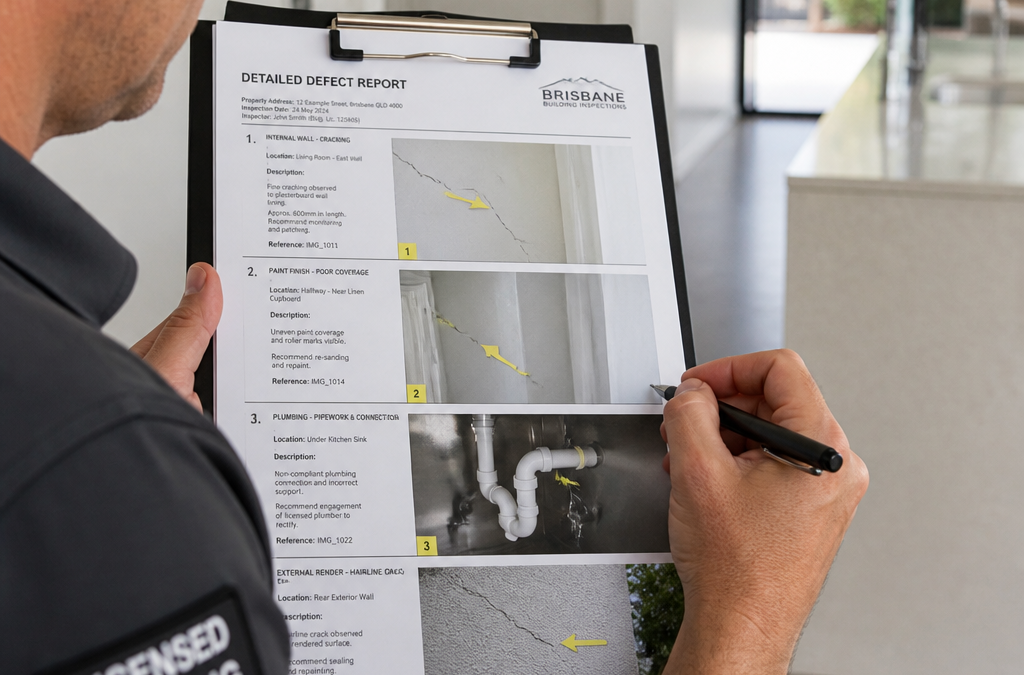
You have just received a building inspection report for your new home. It is 30 pages long, full of trade jargon, defect classifications you have never seen before, and photographs of things that may or may not be serious. If you are not sure what to actually do with it, you are not alone. Most buyers receive their report, skim the summary page, and assume the builder will sort everything out. That is a costly mistake. Knowing how to read a building inspection report is the difference between walking into settlement with confidence and walking into a house full of unresolved problems.
Table of Contents
- What Is a Building Inspection Report?
- Quick Takeaways
- The Anatomy of a Defect Report
- Defect Severity Categories Explained
- How Trade Responsibility Is Assigned
- Reading the Photos in Your Report
- What to Do After You Read the Report
- Comparison: Pre-Handover vs Pre-Settlement vs Defect Investigation
- Frequently Asked Questions
- References
What Is a Building Inspection Report?
A building inspection report is a formal written document produced by a licensed inspector after a systematic walkthrough of a property. For new homes, this typically means a pre-handover or practical completion inspection that captures every defect, incomplete item, and workmanship issue before the owner takes possession.
The report is not a pass or fail certificate. It is a documented snapshot of the property’s condition at a specific point in time, cross-referenced against the building contract, relevant Australian Standards, and the National Construction Code. A well-produced report does not just say something is wrong. It describes what was found, where it is, which trade is responsible, and what rectification is required.
In Southeast Queensland, where GoInspect operates across Brisbane, Gold Coast, Logan, Ipswich, and Redland Bay, new home inspection reports are particularly important because they form the evidentiary basis for any warranty claim you may need to make against the builder under Queensland’s construction contract conditions.
Quick Takeaways
| Key Insight | Explanation |
|---|---|
| Defect categories have real-world consequences | Critical and major defects require immediate attention and often a licensed specialist. Minor defects are cosmetic but still contractually binding for the builder to fix. |
| Photos are evidence, not decoration | Each photo in the report documents the exact location and nature of a defect. These images are your primary tool when following up with the builder. |
| Trade assignment matters | A quality report names which trade caused each defect, such as the tiler, plasterer, or roofer. This helps the builder direct rectification work without confusion. |
| The defects list must be signed | Under Queensland’s standard contract conditions, both you and the builder should agree to the defects list at the practical completion inspection. Do not skip this step. |
| Do not settle before re-inspection | Once the builder notifies you that rectification is complete, book an independent re-inspection before settlement. Verbal confirmation from the builder is not enough. |
| Warranty periods are time-sensitive | In Queensland, you have six years and six months to report structural defects. The clock starts at practical completion, so early documentation is essential. |
| A same-day report gives you negotiating power | Reports delivered the same day as inspection mean you can act immediately. Delays between inspection and report can slow down the rectification process. |
The Anatomy of a Defect Report
Before you can interpret what your report is telling you, it helps to understand how a professional report is structured. Most quality pre-handover reports for new homes follow a consistent format, even if the layout varies between inspectors.
Cover Page and Inspector Details
The cover page confirms the basics: the property address, the inspection date, the inspector’s license details, and the client’s name. Always check the inspector’s license number. In Queensland, building inspectors must hold a current QBCC license. If the inspector’s credentials are not on the report, that is a serious red flag.
The cover page also usually states the scope of the inspection. Confirm that it matches what you commissioned, whether that is a full practical completion inspection, a pre-settlement check, or a focused re-inspection after builder rectification.
Executive Summary
Most reports include a brief executive summary near the front. This is a high-level overview that tells you the total number of defects found, broken down by severity. Do not stop here. The summary is useful for context, but every item in the full report needs your attention.
A common mistake buyers make is reading only the summary, seeing “15 minor defects,” and assuming there is nothing serious. Sometimes a critical defect is buried mid-report because it was found in a less prominent area of the home, such as the roof cavity or subfloor space.
Room-by-Room or Trade-by-Trade Structure
The body of a good pre-handover report organizes defects by location (room or external area) or by trade. Both approaches work. What matters is that each defect entry contains a written description, a severity classification, the responsible trade, and a corresponding photograph. If any of those four elements are missing from a defect entry, the report is incomplete.
Pro tip: As you read each entry, mark it with a highlighter or a sticky note in one of three groups: items you want the builder to fix before settlement, items you will monitor after settlement, and items you want a second opinion on. This simple triage turns a 30-page document into an actionable list.
Defect Severity Categories Explained
Understanding defect severity categories is the most important skill when reading a new home inspection report. Inspectors use different terminology, but the underlying logic is consistent across the industry.
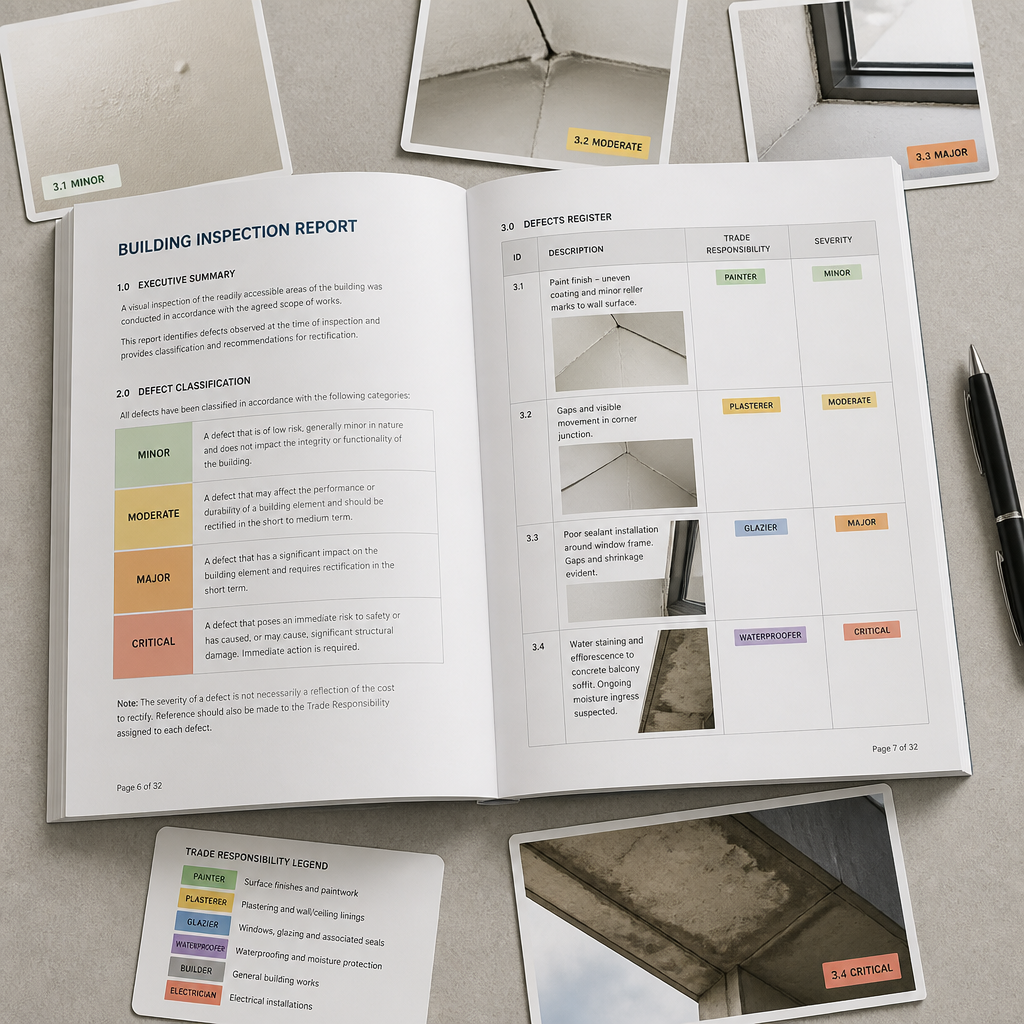
Critical and Major Defects
A critical or major defect is any finding that affects the structural integrity, safety, or habitability of the property. These are the items that should stop everything until they are resolved. Examples include structural cracking in slabs or walls, failed roof framing, non-compliant electrical work, active water ingress, and substandard waterproofing in wet areas.
Major defects typically require a licensed specialist to assess and rectify, not just a general builder. When you see the words “structural concern,” “safety hazard,” “immediate attention required,” or “non-compliant” in your report, treat that item as a major defect regardless of what the severity field says. In practice, some inspectors use different labels for the same level of seriousness.
A critical defect in a new home is not just a problem for today. Left unaddressed, it becomes a warranty dispute, a legal argument, and sometimes a safety incident. The time to resolve it is before settlement, not after.
Moderate Defects
A moderate defect needs attention but is not immediately dangerous. The important thing to understand about moderate defects is that they escalate. A minor roof leak today becomes a major structural issue if it is left unaddressed through a wet Queensland summer.
Common moderate defects in new builds include deteriorated or missing mortar joints, weathered external timber, incomplete or inadequate flashing, and blocked guttering that causes water pooling. These items belong on the builder’s rectification list before you sign off on handover.
Minor Defects
Minor defects are cosmetic or maintenance-level items that do not affect the property’s performance. Uneven paint coverage, small grout inconsistencies, minor door alignment issues, and surface scratches on fixtures fall into this category.
Do not dismiss minor defects as unimportant. The builder is contractually obligated to rectify them. A practical completion inspection that documents 40 minor defects and secures their rectification is saving you real money and effort after you move in.
Pro tip: If your report contains defect items that you believe are misclassified, ask your inspector directly. A good inspector will explain their reasoning. If you receive a report without any verbal debrief or follow-up support, that is worth noting when choosing your inspector next time.
How Trade Responsibility Is Assigned
One of the features that separates a high-quality defect report from a basic one is whether it assigns responsibility to the relevant trade for each defect. This matters because when a builder receives a defect list, they need to know which subcontractor to call.
A report that simply says “cracked tile in bathroom” creates ambiguity. Was it cracked during tiling? Was the substrate inadequate, which is a carpentry or concreting issue? Was it damaged during fit-off by the plumber or electrician? A report that assigns the defect to the tiler, or flags it as a substrate issue for the floor layer, removes that ambiguity and speeds up rectification.
Common Trade Categories in a New Home Report
The trades you will most commonly see referenced in a new home inspection report include the tiler, plasterer, painter, roofer, carpenter or joiner, concreter, waterproofer, plumber, electrician, and glazier. Some reports also reference the supervisor or the site manager when a defect results from a coordination failure rather than poor workmanship by a single trade.
When GoInspect produces a defect report, the assignment of trade responsibility is deliberate and specific. This means that when the report reaches the builder, there is a clear action path for every single item. That specificity is what makes the rectification process faster for everyone involved.
What to Do When Trade Responsibility Is Missing
If your report does not assign trade responsibility, you can still use it effectively. Look at the defect description and the photograph, and make a reasonable inference. If the defect is a paint drip on a door frame, that is the painter. If it is a slab crack at a corner, that is likely a concreting or structural issue. When in doubt, present the item to the builder and ask them to assign it in writing. That creates a paper trail.
Reading the Photos in Your Report
The photographs in a building inspection report are not there to make the document look more professional. They are legal-quality evidence of the property’s condition at the time of inspection. Treat them accordingly.
Each photo should correspond directly to a numbered or labeled defect item. A quality report will use close-up shots to show the specific defect and, where relevant, a wider context shot to confirm the location. If you are looking at a photo and cannot tell where in the house it was taken, that is a problem with the report.
Using Photos to Drive Rectification
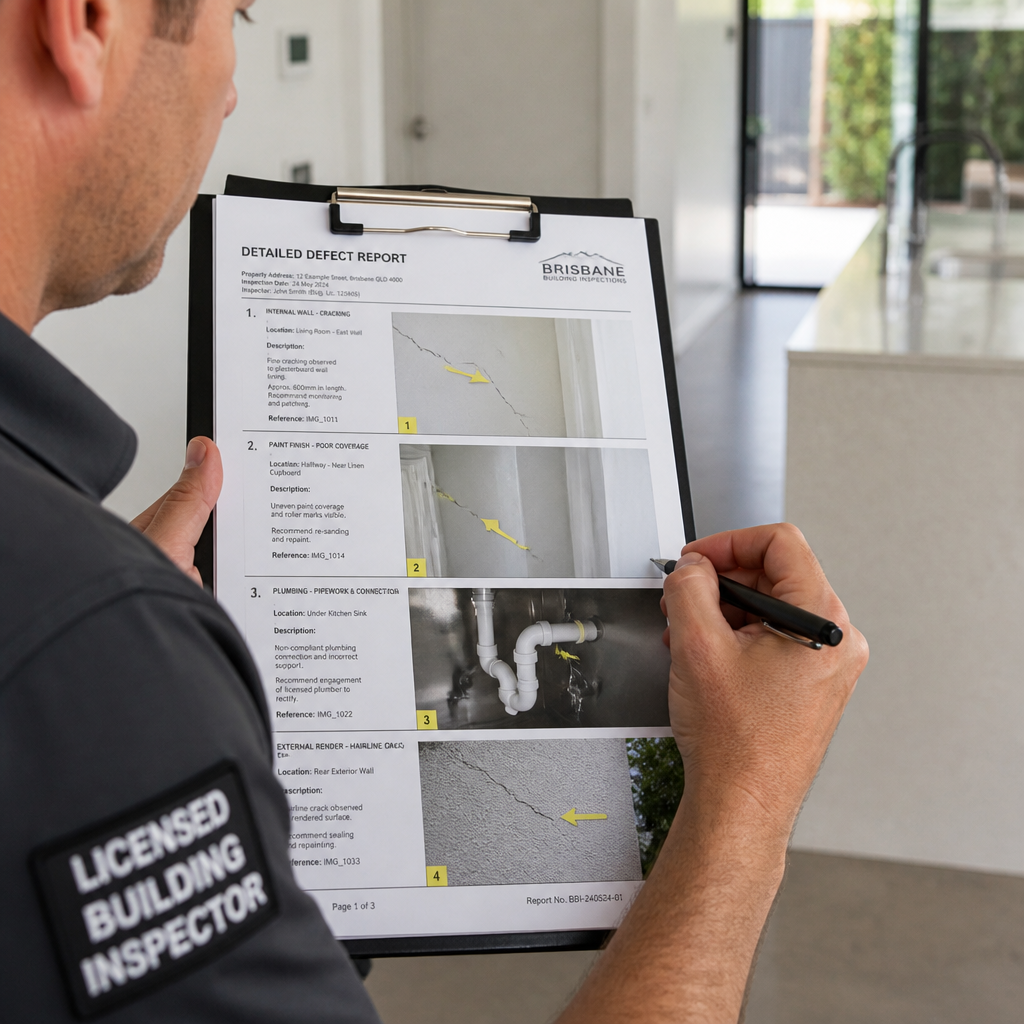
When you send the defect list to your builder, include the corresponding photos for each item. Do not send a written list alone. Builders and their subcontractors work from visual information. A photo of a cracked render section with an arrow pointing to the defect is unambiguous. A written description of the same issue can be misread, ignored, or disputed.
After rectification, compare the builder’s completed work against the original inspection photos. The question is not whether the area looks tidy now. The question is whether the specific defect shown in the original photo has been properly resolved. This comparison is exactly what a re-inspection by an independent inspector checks.
What to Do After You Read the Report
Reading the report is only the first step. The report’s value depends entirely on what you do with it. A detailed defect report that sits in your inbox unactioned does nothing for you.
Step 1: Prioritize the Defect List
Separate the report into items that must be resolved before settlement and items that can be monitored afterward. Critical and major defects belong in the first group, full stop. Most moderate defects belong there too. Minor defects are your judgment call, but everything should at minimum be formally presented to the builder.
Step 2: Submit the List to the Builder in Writing
Email is fine. A formal letter is better. The key is that you have a timestamped written record that you communicated the defects to the builder. Under Queensland’s contract conditions, the builder is responsible for fixing agreed defects within a reasonable timeframe after practical completion. That clock only starts when they have received proper notification.
Step 3: Book a Re-Inspection Before Settlement
Once the builder advises that rectification is complete, do not take their word for it. Book an independent re-inspection. This is the step that most buyers skip, and it is the step that most commonly reveals incomplete or inadequate rectification. A re-inspection by a licensed inspector confirms what was actually fixed, documents the current condition with fresh photos, and gives you the evidence you need if a dispute arises at or after settlement.
GoInspect provides same-day reporting for both initial inspections and re-inspections across Southeast Queensland. That means you are not waiting days to know whether the property is genuinely ready for settlement.
Comparison: Pre-Handover vs Pre-Settlement vs Defect Investigation
Not all inspection reports serve the same purpose. Understanding which type you have, and whether it is the right one for your situation, is part of reading the report correctly.
| Report Type | When It Is Conducted | Primary Purpose |
|---|---|---|
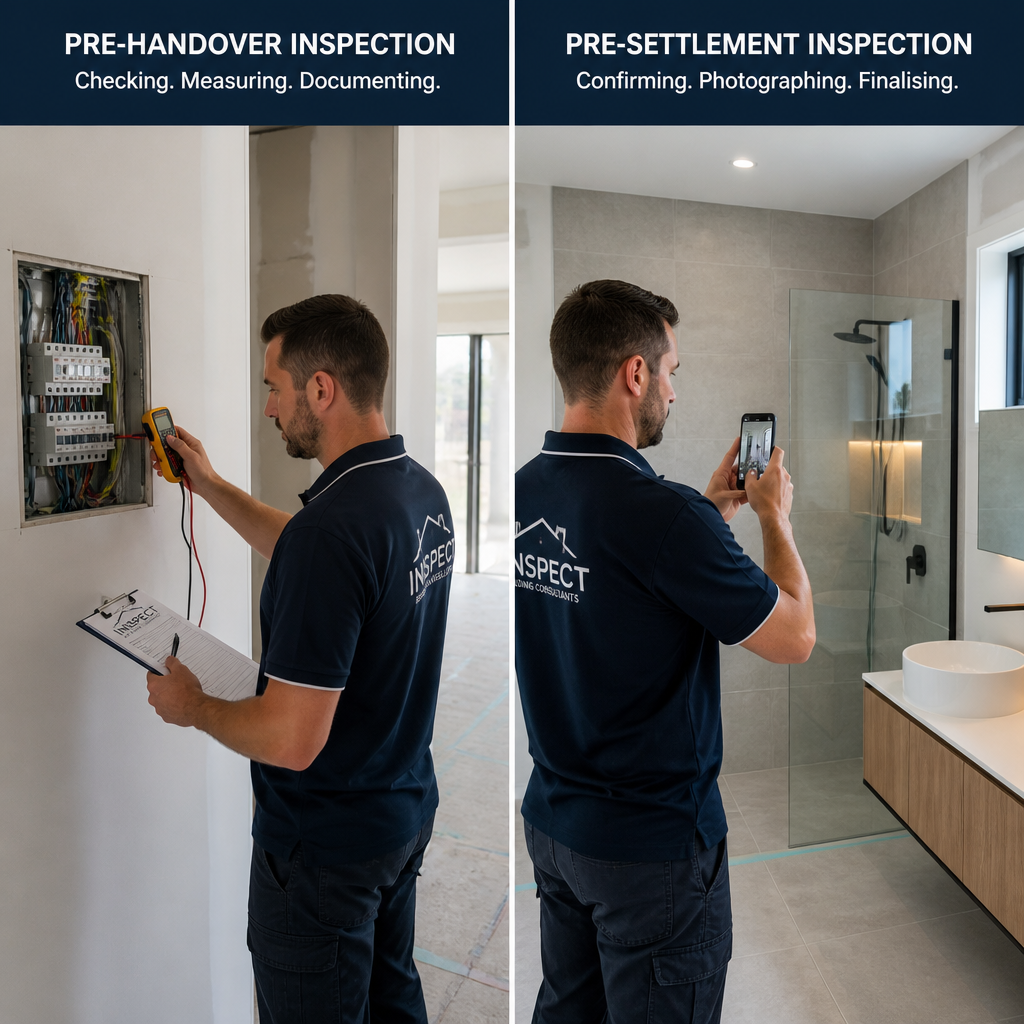
| Practical Completion / Pre-Handover Inspection | When the builder notifies you the home is complete and ready for handover, typically with at least five days’ written notice | Identifies all defects, incomplete work, and items not built to specification before you sign the handover documentation |
| Pre-Settlement Re-Inspection | After the builder has notified you that rectification of the defects list is complete, before settlement | Verifies that each item on the original defects list has been properly resolved and documents the updated condition of the property |
| Defect Investigation Report | After settlement, when a specific problem has been identified and its cause needs to be determined | Explains why a defect occurred, references specific code provisions, and supports warranty claims, tribunal applications, or legal action |
For most new home buyers in Southeast Queensland, the practical completion inspection followed by a pre-settlement re-inspection is the essential sequence. A defect investigation report becomes relevant later if the builder disputes a warranty claim or if a new defect appears after you have moved in.
Frequently Asked Questions
What does a building inspection report actually cover in a new home?
A pre-handover inspection report for a new home covers all visible and accessible elements of the completed property. This includes internal finishes such as painting, plastering, tiling, joinery, and flooring; wet areas including waterproofing, plumbing fixtures, and silicone sealing; external elements such as roofing, fascias, guttering, brickwork, and render; and structural elements including slabs, walls, and roof framing where accessible. The report documents every item that deviates from the contract, the building code, or accepted workmanship standards.
How long does it take to receive a building inspection report?
The turnaround depends on the inspector. Some providers take two to five business days to deliver a report after inspection. GoInspect delivers same-day reports, which means you receive your full photo-enhanced defect report on the same day the inspection is conducted. That speed matters when you are working to a settlement date and need to send the defects list to the builder without delay.
What should I do if my builder disputes a defect in the report?
If the builder disputes a defect, your report is your evidence. A detailed report with a clear written description, a photo, a severity classification, and a trade assignment is difficult to dismiss. If the dispute cannot be resolved directly, you can lodge a formal complaint with the Queensland Building and Construction Commission (QBCC). Having an independent report from a licensed inspector is essential for any QBCC process. Do not accept verbal assurances from the builder that a disputed item is not a defect. Get everything in writing.
Is one inspection enough, or do I need a re-inspection?
For new homes, one inspection is not enough. The first inspection identifies defects before handover. A re-inspection after builder rectification confirms that the items were properly fixed. Skipping the re-inspection is one of the most common and expensive mistakes new home buyers make. It is not uncommon for a re-inspection to reveal that several items from the original defects list were only partially rectified, or that new defects were introduced during the rectification work itself.
What is the difference between a minor defect and a major defect in Queensland?
In Queensland, defects are broadly classified as structural (major) or non-structural (minor) for the purposes of statutory warranty periods. A structural defect is one that affects the structural performance, safety, or habitability of the building. A non-structural defect relates to finishes and workmanship that do not compromise structural integrity. The warranty period for structural defects in Queensland is six years and six months from practical completion. For non-structural defects, the period is six months. This is why it is so important to identify and document all defects at or before handover, before the shorter warranty periods start running.
Can I read my own inspection report without any building knowledge?
Yes, a well-written report is designed to be understood by the homeowner. If your report is written entirely in technical jargon without plain-English descriptions, that is a problem with the report, not with you. A good inspector writes each defect entry so that a non-builder can understand what was found, why it matters, and what needs to be done. GoInspect produces reports with plain-language descriptions and photo evidence so that homeowners, builders, and developers can all work from the same document without needing a translator.
Have you recently received a building inspection report and found something confusing or unexpected? Share your experience in the comments so others can learn from it.
References
- Queensland Building and Construction Commission guide to practical completion inspections and defect lists
- Plain-English explanation of building inspection report defect categories for buyers
- Homeowner guide to understanding and acting on a property inspection report
- How statutory warranty periods work and why pre-settlement defect inspections matter
- Why a re-inspection after builder rectification is essential before settlement